Run Jenkins In Docker Using Docker Compose With Persistent Volumes
How to Run Jenkins on Docker with Persistent Volumes
Do you want to setup Jenkins on Docker? But You may just curious about the persistence of your Jenkins data. Ok, I will explain them here step by step.
You may arise a few questions like…
How can I access Jenkins data from outside of the container?
Are these data persists even after the Jenkins container restarted?
What happens if the container crashed?
how do I backup data after Jenkins is containerized?
In this tutorial, I will walk you through setting up the Jenkins server on docker with persistent volumes. First, I’ll show you each step manually, and then I’ll use docker-compose to make things faster and reusable.
In this tutorial, I will walk you through the following sections.
Section 01. Run Jenkins on a Docker Container Manually
Section 02. Run Jenkins on a Docker Container Using Docker Compose ( make things faster and reusable)
What is Jenkins?
Jenkins is an open-source continues integration and continues deployment tool. Which can use to automate application building, testing and deploying. Jenkins is the most popular CI/CD automation tool.
We can extend Jenkins’s capability by integrating with many other tools such as SonarQube and measuring code quality and standard before the deployment performed. And also, Jenkins supports thousands of plugins that can use to make things easier.
Prerequisites
Hardware Requirement
| Minimum Requirement | Recommended Requirement |
|---|---|
| 256MB+ of RAM | 1GB+ of RAM |
| 1GB+ HDD Capacity | 50GB+ HDD Capacity |
Sections 01: Run Jenkins On Docker Container Manually
STEP 01: Install Docker and Docker-Compose On Ubuntu
You can directly jump into the “STEP 02” If you have already installed Docker Engine on your host. In the 1st step, I’m setting up my Ubuntu host to run the Docker container.
Note: You can skip this section and jump to “STEP 02” if you already installed docker on your HOST. Or else you are going to do this on a Cloud Platform.
Install Docker Engine
- Setup The Repository
Update Ubuntu once.
sudo apt-get update -y
- Install Additionally Required Packages.
sudo apt-get install -y apt-transport-https ca-certificates curl gnupg-agent software-properties-common
- Install Official Trusted GPG Key
curl -fsSL https://download.docker.com/linux/ubuntu/gpg | sudo apt-key add -
- Add Docker Stable Repository
sudo add-apt-repository "deb [arch=amd64] https://download.docker.com/linux/ubuntu $(lsb_release -cs) stable"
- Update OS
sudo apt-get update -y
- Install Docker Docker Engine
sudo apt-get install docker-ce docker-ce-cli containerd.io -y
- Start and Enable Docker Daemon Service
sudo systemctl enable docker.service
sudo systemctl start docker.service
For Production usage, always use official, Long-Term Support(LTS) releases. But, the official Docker image doesn’t come with docker CLI inside the Jenkins image.
Install Docker Compose
- Download Docker Compose Binary
sudo curl -L "https://github.com/docker/compose/releases/download/1.28.5/docker-compose-$(uname -s)-$(uname -m)" -o /usr/local/bin/docker-compose
- Provide executable permissions
sudo chmod +x /usr/local/bin/docker-compose
- Set the binary executable path
sudo ln -s /usr/local/bin/docker-compose /usr/bin/docker-compose
- Verify Installation
docker-compose --version
STEP 02: Create Docker Bridge Network
First, I’m going to create a bridge network named “jeknins-net”. And I will attach all docker containers to this network.
sudo docker network create jenkins-net
STEP 03: Create Docker Volumes
Here we are going to create volumes and map them into Jenkins container. We may need these volumes to store the Jenkins data persistently. This volume use to make sure you don’t lose your Jenkins data even after a reboot or crash container situations.
I will create a Docker volume to store the “JENKINS_HOME” directory, which use to mount into the docker host machine.
| Docker Host | Jenkins Container |
|---|---|
| jenkins-data | /var/jenkins_home |
sudo docker volume create jenkins-docker-data
STEP 04: Start Jenkins Server Container
In this step, we will use the same bridged network created as “jenkins-net” at STEP 02. Basically, Docker-Agent(Dind) and Jenkins Servier will be on the same Docker network.
sudo docker container run --name jenkins-server --detach --restart unless-stopped --network jenkins-net --hostname jenkins --publish 8080:8080 --volume jenkins-data:/var jenkins_home jenkins/jenkins:lts
If you were wondering what the arguments stand for, here is what each means:
-d: detached mode
-v: attach volume
-p: assign port target
—name: Name of the container
TCP port 8080 is using to access the Jenkins dashboard. Instead of the default port 8080, we can use any other uncommon TCP port as well.
In the above command, we can see “–volume” is the most crucial argument which helps docker link the volume into the docker container and preserve data persistency. The jenkins docker container path “/var/jenkins_home” where the Jenkins container is storing the data. You don’t need to worry about the docker container to restart or even after a container crashed. You can easily mount this volume into the new container in such a situation.
Finally, You can see them out like this.
dimuthu@svr05:~$ sudo docker container ps
CONTAINER ID   IMAGE                 COMMAND                  CREATED         STATUS         PORTS                               NAMES
b45233ebcbba   jenkins/jenkins:lts   "/sbin/tini -- /usr/…"   7 seconds ago   Up 5 seconds   0.0.0.0:8080->8080/tcp, 50000/tcp   jenkins-server
STEP 05: Access Jenkins Console
Access your Jenkins Server through the web browser
http://<DOCKER-HOST-IP>:8080/
STEP 06: Get Jenkins Init Password
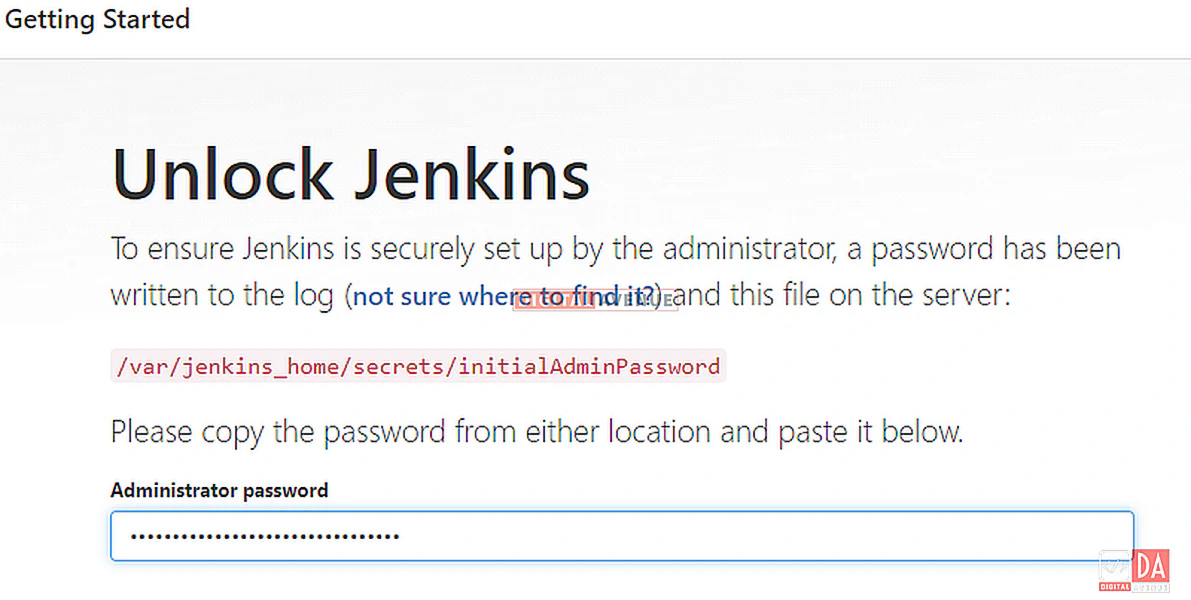
In the post configuration wizard, It will be asking for an administrator password. So, You need to access the running Jenkins container to get this password. You can get the initial default Administrator password using the following command.
You can use Jenkins container ID or name and the following command. According to my setup, Jenkins-server is our Jenkins docker container name. And copy the output and paste it into the text box.
sudo docker exec jenkins-server cat /var/jenkins_home/secrets/initialAdminPassword
02ac16bd27af4e8c8d1ffc82841f419f
Or else you can use the following command. Replace your container name or ID.
docker container exec [CONTAINER ID or NAME] sh -c "cat /var/jenkins_home/secrets/initialAdminPassword"
STEP 07: Install Jenkins Plugins
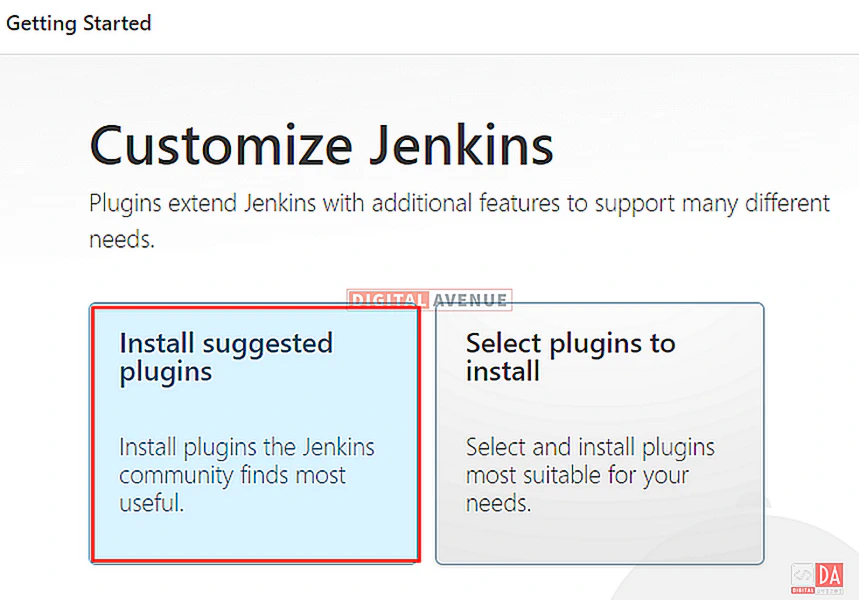
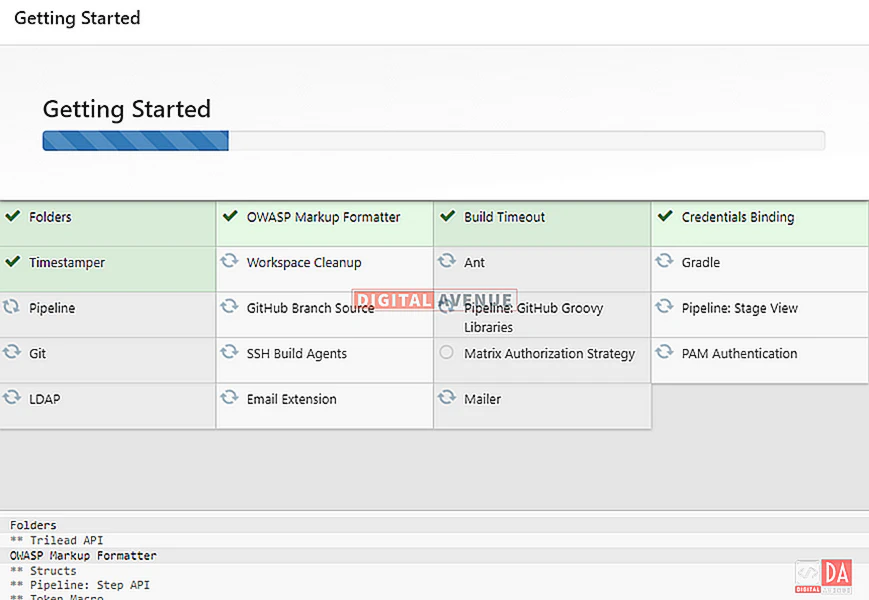
As usually, We can install the required plugins from here. In my case, I’ll choose the “install suggested plugin” options. And please wait until Installation completed.
STEP 08: Create First Admin User
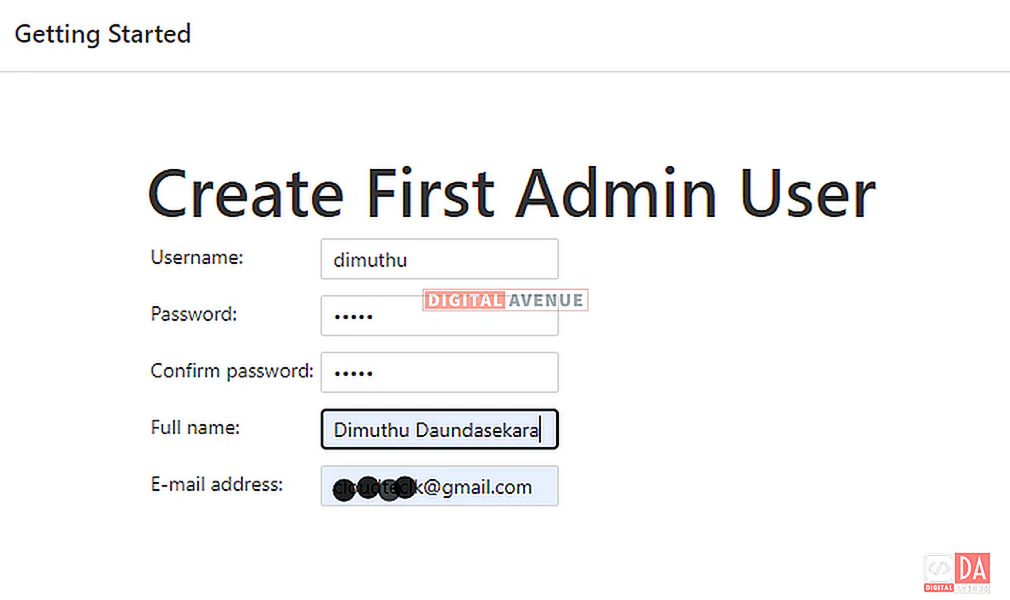
Create an administrator user providing your details here.
STEP 09: Instance configuration
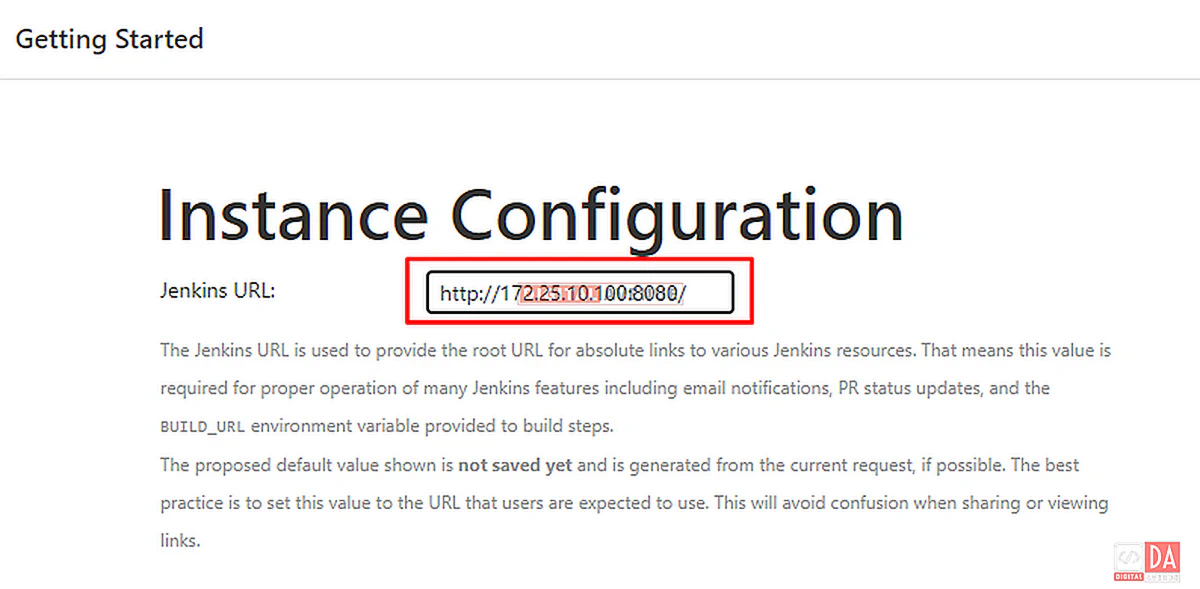
After creating the admin user, next move on to set up the Instance configuration. Since you need to access Jenkins internally, leave the URL to your localhost URL. Either you can provide your FQDN or IP address. If you not sure, go to this URL as it is.
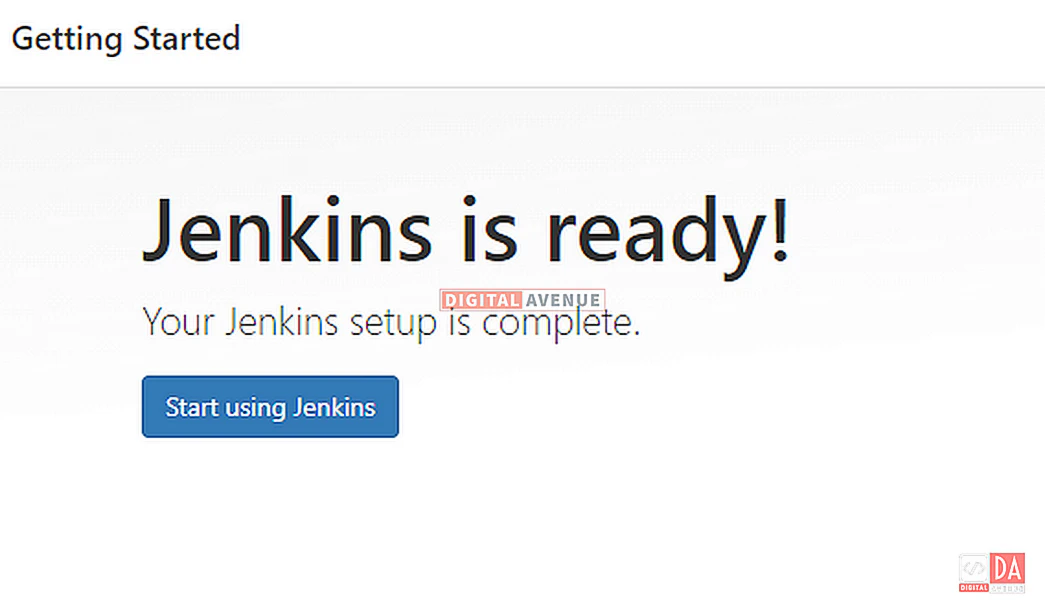
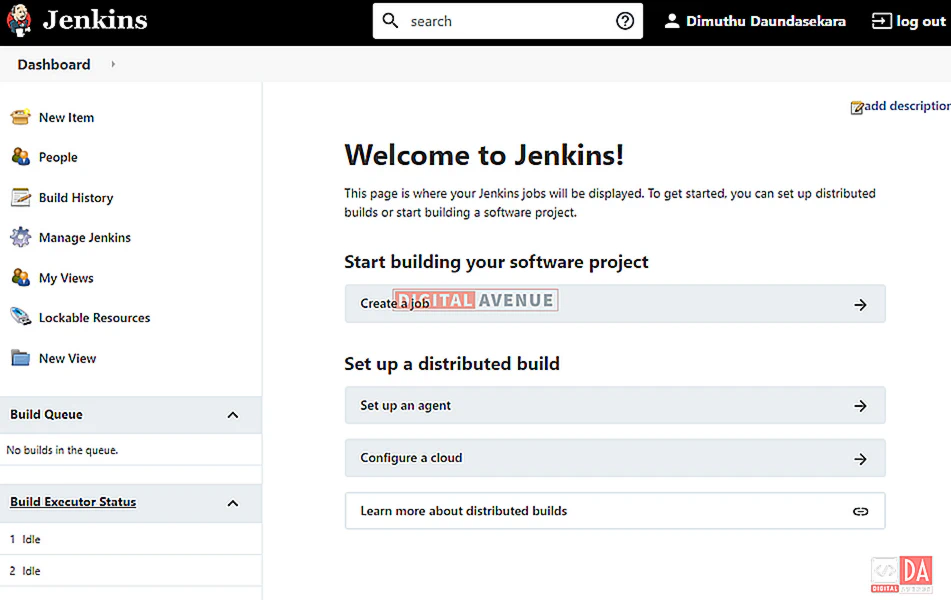
Now, the Jenkins server has been set up successfully. Now, I’m going to check the data persistency.
STEP 10: Confirm Jenkins Data Persistency
Once you logged into the Jenkins dashboard, I will create a sample job to whether Jenkins is working fine.
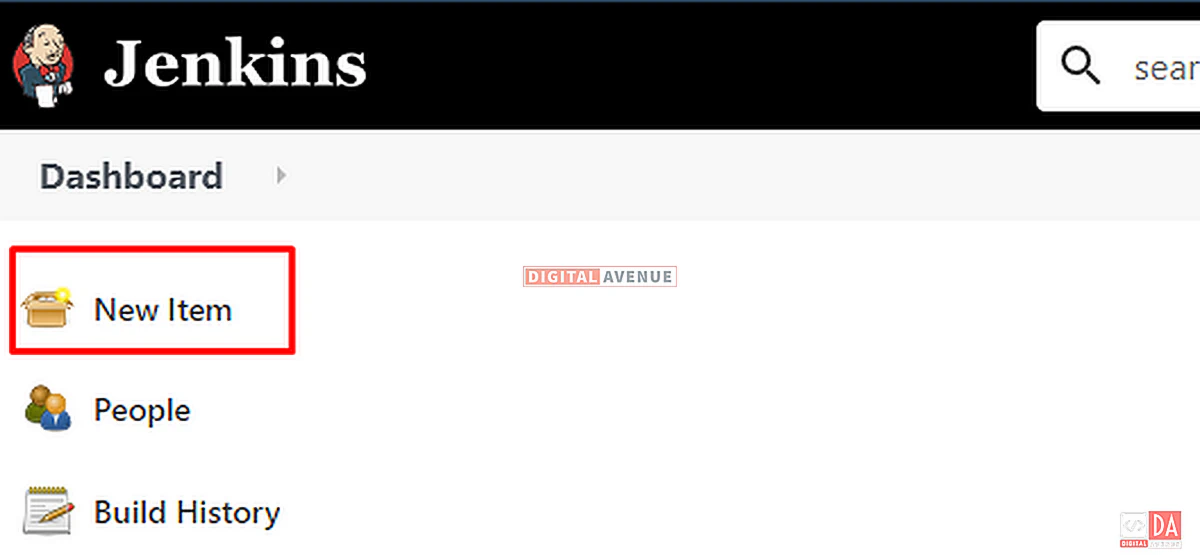
Now head-over to Jenkins dashboard and click on “New Item.”
On the next screen, enter a job name. In this case, I’m naming it HelloWorld. and then choose the “Freestyle” project option.
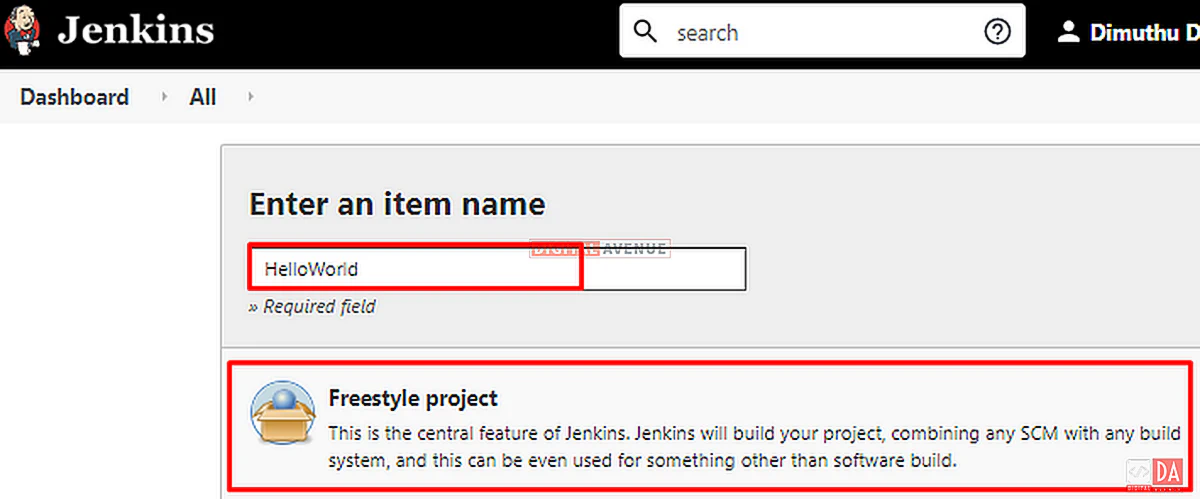
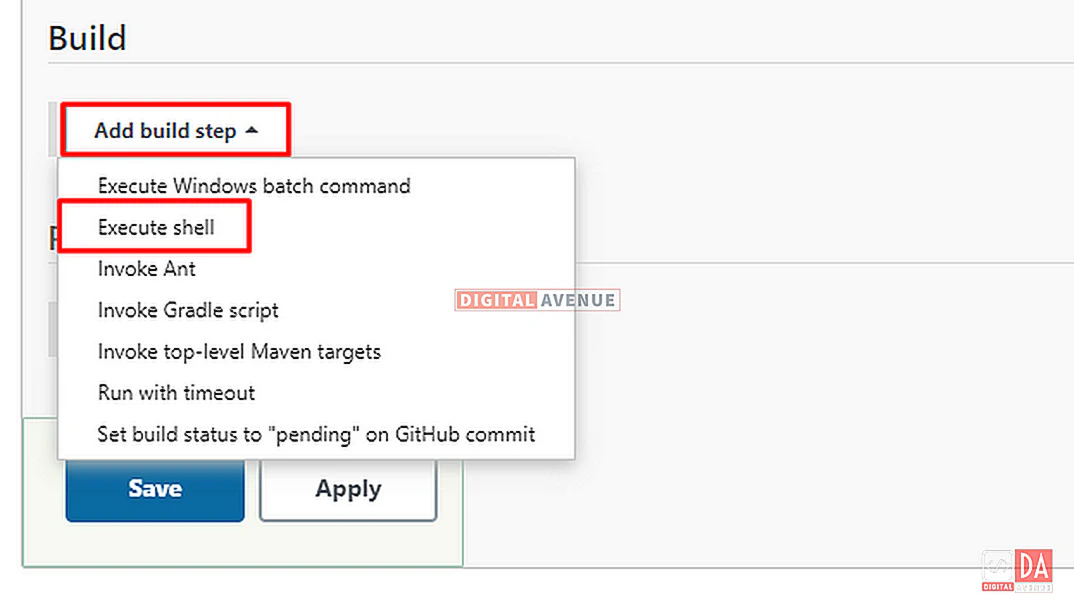
Then, In the next screen, move on to the “Build” tab and click on the “Add Build Step” button and choose the “Execute Shell” option.
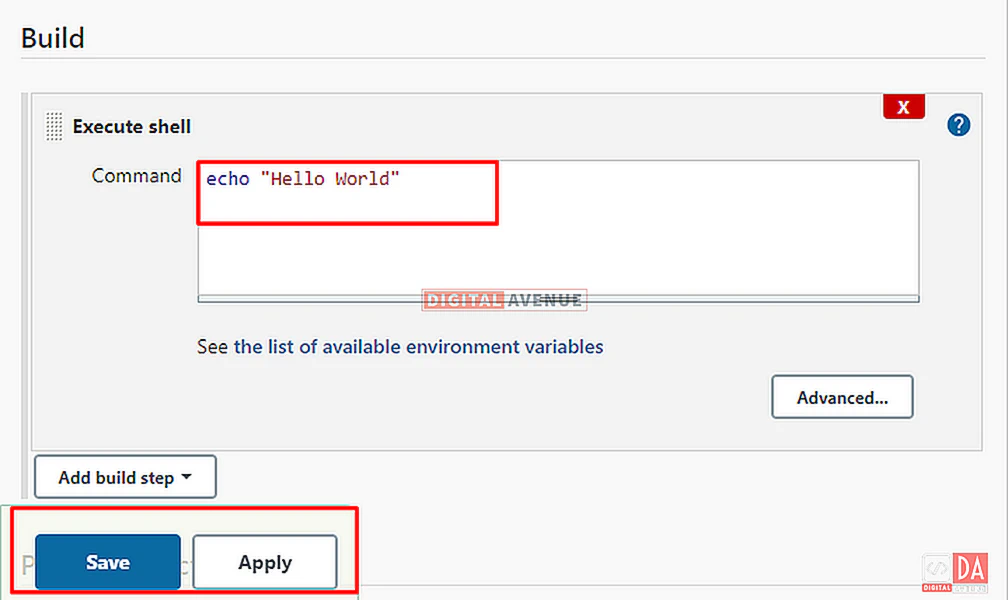
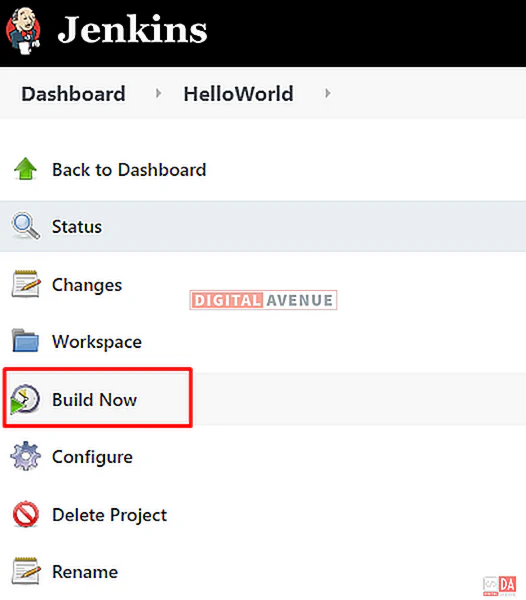
Then save the job and click on the “Build Now” button to start the job.
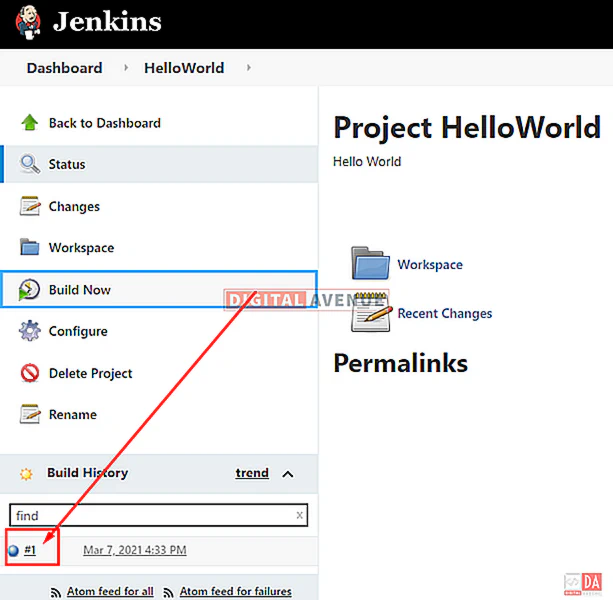
Click on the Build Status (blue ball) under Build History (left sidebar) to view the console output. You should see that our command ran with no problems.
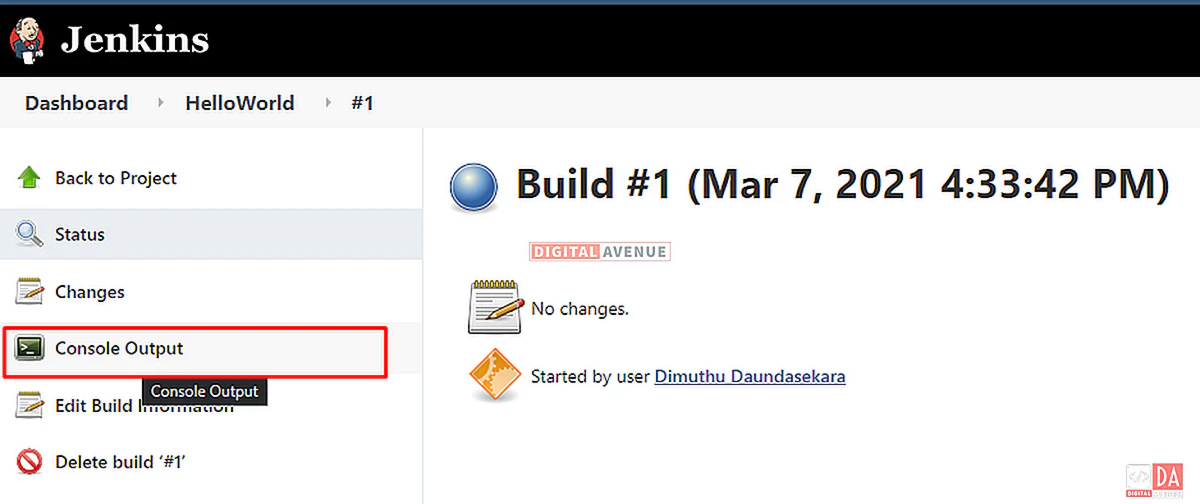
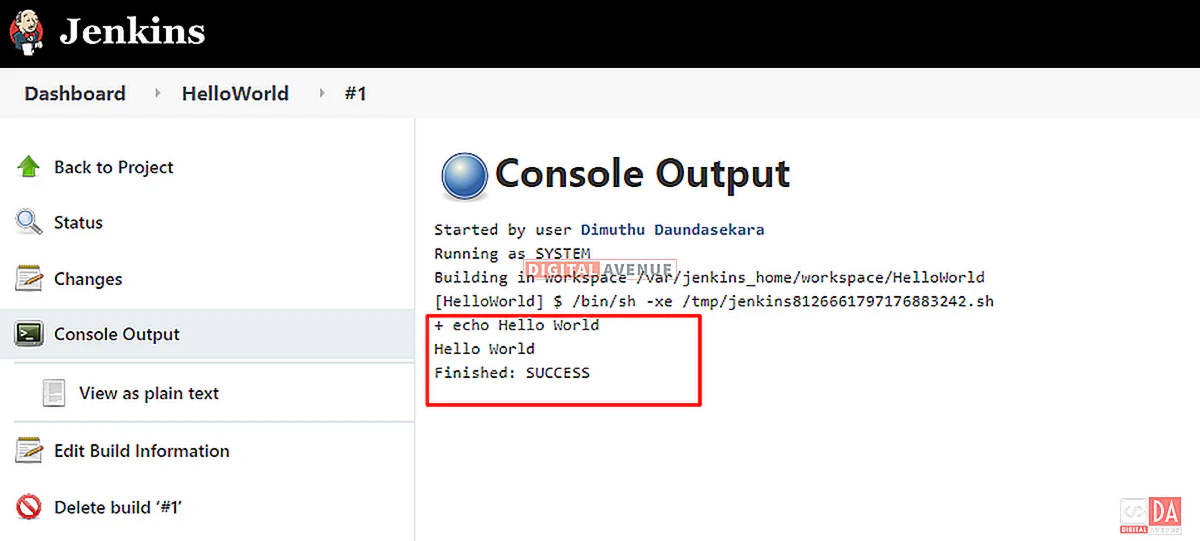
Other than the step that I’ve mentioned above, there so many ways to create build jobs. That’s what makes Jenkins such a fantastic continuous deployment tool.
Section 02. Run Jenkins on a Docker Container Using Docker Compose ( Make things faster and reusable)
Run Jenkins on Docker Using Docker-Compose
In the previous sections, I’ve created a docker container that runs the Jenkins instance. Docker containers are ephemeral. These containers can be stopped or destroyed and build new once anytime using docker images. If something terrible happens, it may cause Jenkins data losses too.
Now, I’m going to do the same setup using docker-compose with persistent data volume mounts.
Where is the Jenkins Data in Docker Container?
It’s always better to understand where the Jenkins data stored. To list Jenkins data, you can use the following command.
docker exec jenkins-server ls -l /var/jenkins_home
In here, “jenkins-server” is my Jenkins container name. So, You can replace it with your container name. After executing the command, You can see what the output looks like below.
total 108
-rw-r--r--  1 jenkins jenkins  1647 Mar  7 14:23 config.xml
-rw-r--r--  1 jenkins jenkins    53 Mar  7 14:01 copy_reference_file.log
-rw-r--r--  1 jenkins jenkins   156 Mar  7 14:01 hudson.model.UpdateCenter.xml
-rw-r--r--  1 jenkins jenkins   370 Mar  7 14:18 hudson.plugins.git.GitTool.xml
-rw-------  1 jenkins jenkins  1712 Mar  7 14:01 identity.key.enc
-rw-r--r--  1 jenkins jenkins     7 Mar  7 14:23 jenkins.install.InstallUtil.lastExecVersion
-rw-r--r--  1 jenkins jenkins     7 Mar  7 14:23 jenkins.install.UpgradeWizard.state
-rw-r--r--  1 jenkins jenkins   183 Mar  7 14:23 jenkins.model.JenkinsLocationConfiguration.xml
-rw-r--r--  1 jenkins jenkins   171 Mar  7 14:01 jenkins.telemetry.Correlator.xml
drwxr-xr-x  3 jenkins jenkins  4096 Mar  7 16:21 jobs
drwxr-xr-x  3 jenkins jenkins  4096 Mar  7 14:01 logs
-rw-r--r--  1 jenkins jenkins   907 Mar  7 14:01 nodeMonitors.xml
drwxr-xr-x  2 jenkins jenkins  4096 Mar  7 14:01 nodes
drwxr-xr-x 79 jenkins jenkins 12288 Mar  7 14:18 plugins
-rw-r--r--  1 jenkins jenkins   129 Mar  7 16:34 queue.xml
-rw-r--r--  1 jenkins jenkins    64 Mar  7 14:01 secret.key
-rw-r--r--  1 jenkins jenkins     0 Mar  7 14:01 secret.key.not-so-secret
drwx------  4 jenkins jenkins  4096 Mar  7 16:35 secrets
-rw-rw-r--  1 root    root     7152 Feb 10 17:58 tini_pub.gpg
drwxr-xr-x  2 jenkins jenkins  4096 Mar  7 14:18 updates
drwxr-xr-x  2 jenkins jenkins  4096 Mar  7 14:01 userContent
drwxr-xr-x  3 jenkins jenkins  4096 Mar  7 14:23 users
drwxr-xr-x 11 jenkins jenkins  4096 Mar  7 14:01 war
drwxr-xr-x  2 jenkins jenkins  4096 Mar  7 14:18 workflow-libs
drwxr-xr-x  3 jenkins jenkins  4096 Mar  7 16:33 workspace
Where is the Jenkins Data in Docker Host?
As we did before, Our Jenkins container’s “JENKINS_HOME” directory is mounted to the “jenkins_home” directory in our Docker host machine.
You can find your docker volume using the command below.
dimuthu@srv01:~/$ docker volume inspect jenkins-data
[
    {
        "CreatedAt": "2021-03-07T16:34:42Z",
        "Driver": "local",
        "Labels": null,
        "Mountpoint": "/var/lib/docker/volumes/jenkins-data/_data",
        "Name": "jenkins-data",
        "Options": null,
        "Scope": "local"
    }
]
According to the output, You can see the “JENKINS_HOME” directory is mounted on “/var/lib/docker/volumes/jenkins-data/_data” docker volume. This means your data is persistent under that directory, and it is available even container is deleted. So, data will remain on the Docker host.
STEP 03: Create Docker-Compose.YAML
Another best way to run Jenkins is by using the docker-compose command. By using docker-compose. yaml, you can deploy multiple Jenkins containers more quickly.
Open your favourite text editor and create a new file named “docker-compose.yaml”, and paste the below YAML manifest into the file. And the save and exit.
sudo vim docker-compose.yml
version: "3.9"

services:
  jenkins:
    image: jenkins/jenkins:lts
    container_name: jenkins-server
    privileged: true
    hostname: jenkinsserver
    user: root
    labels:
      com.example.description: "Jenkins-Server by DigitalAvenue.dev"
    ports:
      - "8080:8080"
      - "50000:50000"
    networks:
      jenkins-net:
        aliases:
          - jenkins-net
    volumes:
     - jenkins-data:/var/jenkins_home
     - /var/run/docker.sock:/var/run/docker.sock

volumes:
  jenkins-data:

networks:
  jenkins-net:
You can change this docker-compose file as you want. But, here I’ll explain the most essential sections only.
image = The base image name used to create a docker instance. Generally, this will be pulled from the docker hub docker registry.
Ports = This defines port mapped between docker container and the docker host machine
volume = This defines container data storage volume mapped between the docker container and the docker host machine. This allows accessing containerized data from the docker host.
Container_name = This defines the name of the container that you are going to spin up. In here, I’m using “jenkins-server” as my container name.
04: Run Docker Container Using Docker-Compose In Detached Mode
docker-compose up -d
05: Access Jenkins Console
http://<YOUR-IP-OR-FQDN>:8080/
06: Get Init Administrator Password
docker exec jenkins-server cat /var/jenkins_home/secrets/initialAdminPassword
Summary
In this article, you learned to deploy Jenkins using imperatively and declaratively. You also learned how to get your hands dirty with docker volumes and how to mount them.
You also learned how to preserve container data on docker volumes by mounting docker volume into a docker container. Making the Jenkins settings persistent and consistent even if the Docker container is deleted.
If you are facing issues with the implementation, please comment below. I will regularly reply here.
Deploy Production Grade Kubernetes Cluster on Azure AKS
Introduction This tutorial is intended to demonstrate how to setup your 1st Kubernetes cluster on Azure Kubernetes Services (AKS). This tutorial will cover up all the steps that you need to setup complete AKS cluster.
Getting Started With Docker - Quick Start Guide
Getting Started With Docker - Quick Start Guide Docker Engine Platform as a Service (PaaS) Cloud platform service. Allows you to manage its application and data.
How To Run Microsoft SQL Server On Kubernetes - Azure Kubernetes Service
Prerequisites: Azure CLI https://docs.microsoft.com/en-us/cli/azure/install-azure-cli 1. Run the Azure CLI with the az command. 1.1 Run the login command. az login Login in the browser with the azure account.
