How To Integrate GitLab With Jenkins
Before You Begin
In this tutorial, I’m going to demonstrate to you how to integrate GitLab with Jenkins Server. I suppose You’ve already installed Jenkins on your own. If you haven’t Jenkins server, Please refer to my previous video and article. I’ll put the link in the description.
REF: https://digitalavenue.dev/How-To-Install-and-configure-Jenkins-on-Ubuntu-18.04/
How To Install and Configure Jenkins : https://digitalave.github.io/spring/2020/04/06/How-To-Install-and-configure-Jenkins-on-Ubuntu-18.04.html
If you don’t have a GitLab account, Please create an account.
REF: https://gitlab.com/
Prerequisites :
Pre-Configured Jenkins Server
GitLab Account With Developer Role Permission
Introduction :
Jenkins is an open-source software development platform enriched with continuous integration (CI) and many more DevOps automation capabilities.
Organizations using Jenkins to build and deploy applications and integrate with GitLab for other DevOps tools.
GitLab - Jenkins integration allows you to build and deploy an application on Jenkins and reflect the output on the GitLab UI more convenience
Integration GitLab and Jenkins allows you to trigger a Jenkins build when a code is pushed to a repository or when a merge request is created.
STEP 01: Install GitLab Plugins on Jenkins Server
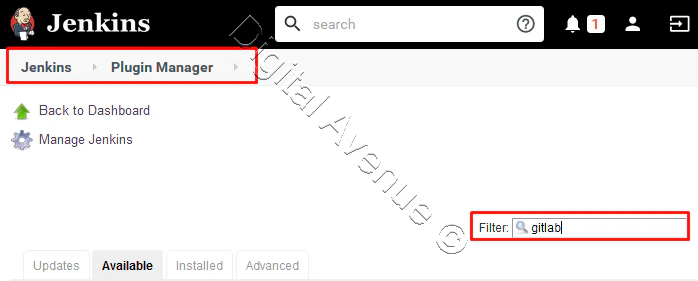
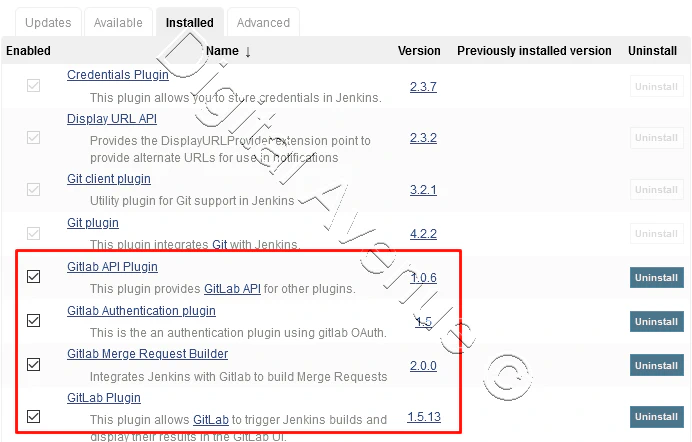
Go to the Manage Plugin section, then search and install the following plugins on your Jenkins server.
"Git"
"GitLab Plugin"
"GitLab API Plugin"
"Credentials Plugin"
"GitLab Authentication Plugin"
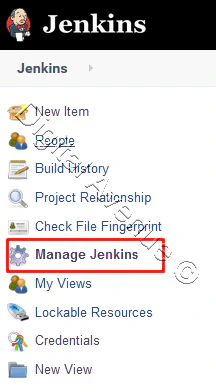
Manage Jenkins > Manage Plugins > Available Plugin [Search] > Install and Restart
STEP 02: Create a New GitLab User / Promote Existing GitLab User
Create a new GitLab user with “Developer” role permission and grant access to each repository/project you want to integrate with Jenkins
Note: User should have Developer Permission Role
STEP 03: Create Personal Access Token on GitLab
Now, Let’s head over to the GitLab account and move to your profile setting section.
User Settings > Access Tokens
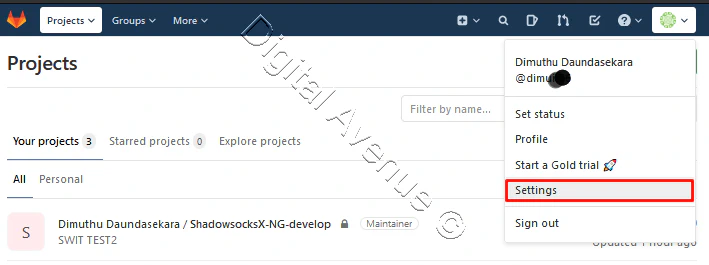
Create a new Personal Access Token for Jenkins authentication.
Name: Provide Token Name
Scope: API - Which Grant access to GitLab resources such a Projects, Groups and Registries.


Save the deployed token somewhere safe. Once you leave or refresh the page, you won’t be able to reaccess it.
NOTE: Once you’ve generated a Personal Access Token, copy it and save it in a separate file immediately.Because Token only visible only once.
Jenkins-GitLAB_API-Access : i5Jfi8a5foEFoC9CkVzl
STEP 04: Add GitLab Personal Access Token to Jenkins
Again, Head-over to the Jenkins server and Then, We need to add an authentication token into the Jenkins server.
Jenkins > Credentials > System > Global Credentials > Add Credentials
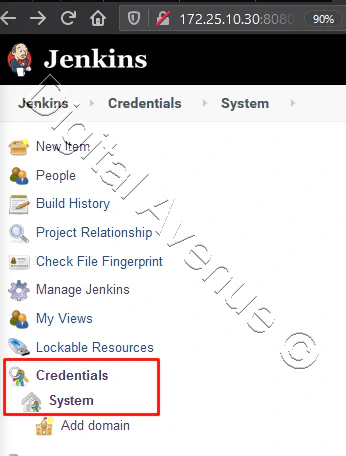
Scroll down a little and click on “Global Credentials” under the Domain column and “Add Credentials”.

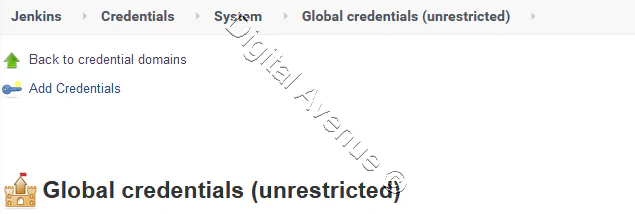
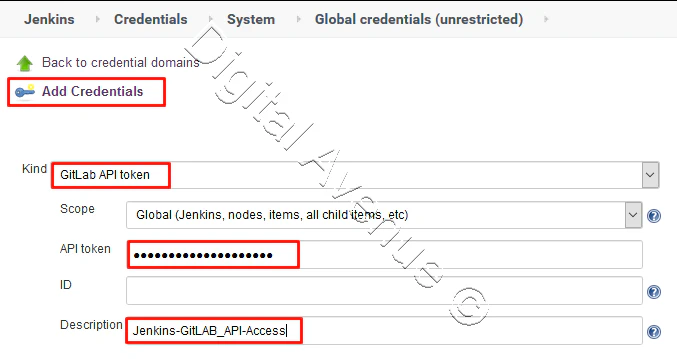
Select the following options for the “Global Credentials” section.
Kind: GitLab API Token
API Token: Add Previously Generated Personal Access Token
Description: Provide a Descriptive Name
STEP 05: Configure GitLab API Settings on Jenkins Server
Let’s move on to “GitLab” configuration section in Manage Jenkins > Configure System.
Manage Jenkins > Configure System > “GitLAB” Configuration Section.
Then, Configure the following entries…
Enable authentication for ‘/project’ end-point : Enable
Connection Name: Provide a Descriptive Name
GitLab host URL: GitLab server URL
Credentials: Select previously added credentials from the drop-down menu.
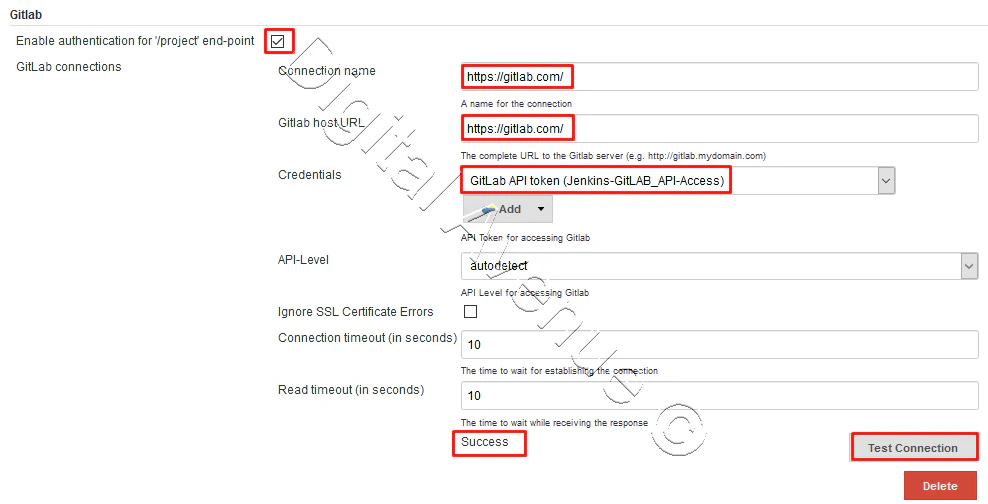
Finally, check whether the connection is successful by pressing “Test Connection” button. If the connection is successful. Then move to the next step.
Now, the Connection between Jenkins and GitLab is OK. GitLab API plugin used to access for Jenkins to get metadata from GitLab.
But, We need to have an SSH key authentication to commit changes from Jenkins to GitLab.
STEP 06: Allow GitLab Build Commit Push-Pull Authentication To GitLab
Two Methods :
1. Using SSH public-Private Key Pair
Create SSH Key Pair on Jenkins Server
Login to Jenkins host terminal console and switch to “jenkins” user and move to Jenkins home directory. And generate an SSH-Key-Pair.
root@SRV3:~# su - jenkins
jenkins@SRV3:~$ cd /var/lib/jenkins/
jenkins@SRV3:~$ ssh-keygen
Generating public/private rsa key pair.
jenkins@SRV3:~$ cd /var/lib/jenkins/.ssh/
jenkins@SRV3:~/.ssh$ ls
id_rsa  id_rsa.pub  known_hosts
Open “id_rsa.pub” file and copy the content.
Provide Public Key To GitLab
Go to GitLab and deploy a new ssh key. Go to your GitLab profile “Setting” and then go to “SSH Keys” section.
Paste code that we copied content from “id_rsa.pub” file.
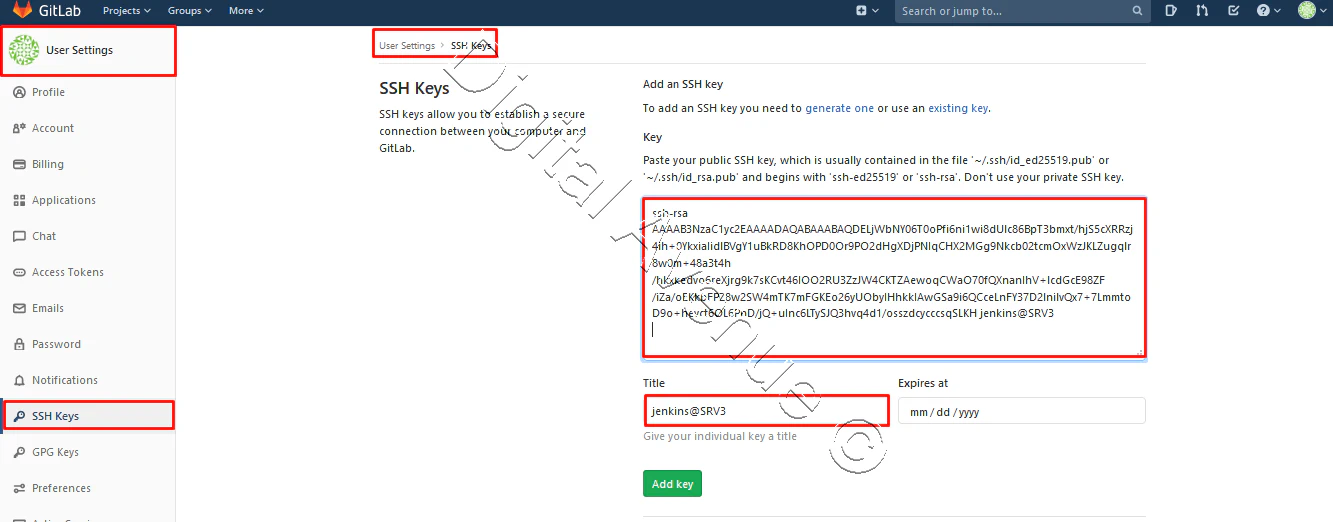
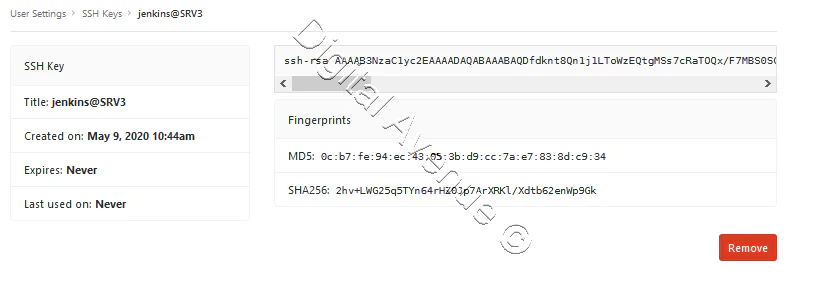
Now, a Public key has been added to the GitLab server.
Provide Private Key To Jenkins
Then, We need to add our private key to the Jenkins server.
Open “/var/lib/jenkins/.ssh/id_rsa” file and copy content from private key.
vim /var/lib/jenkins/.ssh/id_rsa
Go to Jenkins > Credentials > System > Global Credentials > Add Credentials
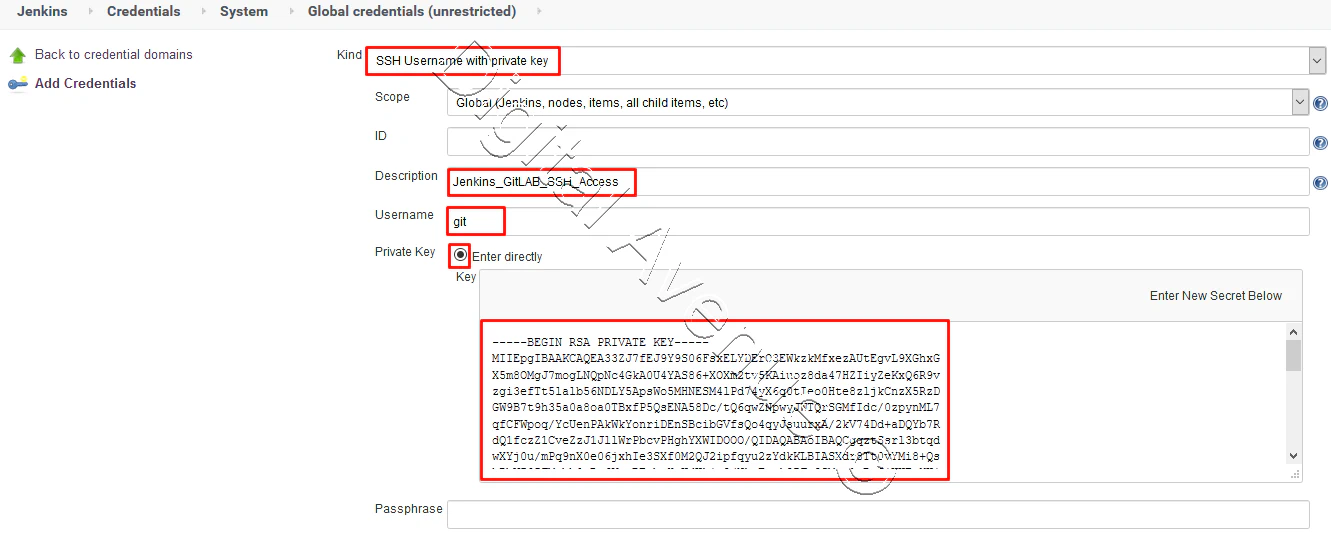
Click the “Add” button next to the “Credentials” field and select the “Jenkins” option. In the resulting dialogue, select “SSH Username with private key” as the credential typeset the “Username” to git, and enter the content of the private key selected for use between GitLab and Jenkins.
Kind: SSH Username with private key
Description: Provide descriptive name
** Username: git**
Private Key: Enter private key
Remember that you already attached the corresponding public key to your GitLab profile in step in the previous step.
Add copied public key content into “Key” section.
2. Using Plain Credentials - Username:Password

STEP 07: Push Local Project To GitLab - Optional Step
Now, I’m going to push my local project into the GitLab repository.
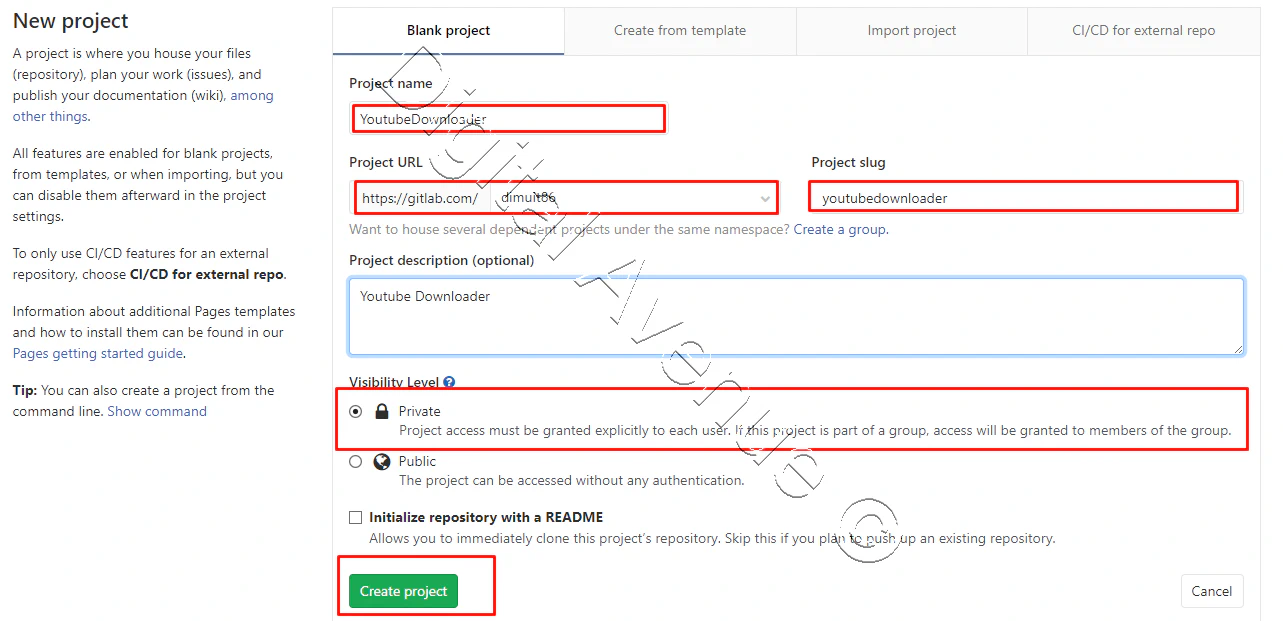
Open Your Command Prompts / Or Use Your Own Method
C:\Users\Dimuthu>git config --global user.name "Dimuthu Daundasekara"

C:\Users\Dimuthu>git config --global user.email "dimuthu@gmail.com"

C:\Users\Dimuthu>cd C:\YoutubeDownloader-master\YoutubeDownloader

C:\YoutubeDownloader-master\YoutubeDownloader>git init

C:\YoutubeDownloader-master\YoutubeDownloader>git remote add origin git@gitlab.com:dimuit86/youtubedownloader.git

C:\YoutubeDownloader>git add .

C:\YoutubeDownloader-master\YoutubeDownloader>git commit -m "Initial commit"

C:\YoutubeDownloader>git config credential.helper store

C:\YoutubeDownloader-master\YoutubeDownloader>git push https://gitlab.com/dimuit86/youtubedownloader.git
STEP 07: Configure Jenkins Project
Create FreeStyle Project on Jenkins
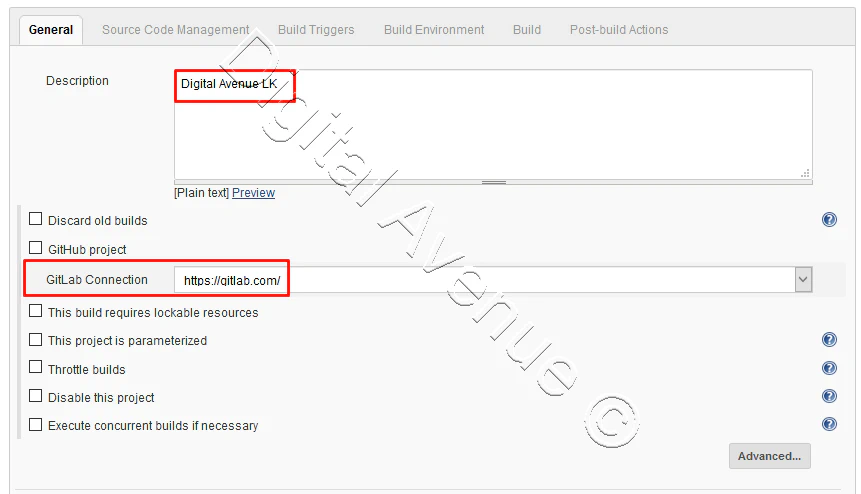
Now, It’s time to create a new project and do further configuration.
Jenkins > New Item > FreeStyle Project
Give a name to the project and continue.

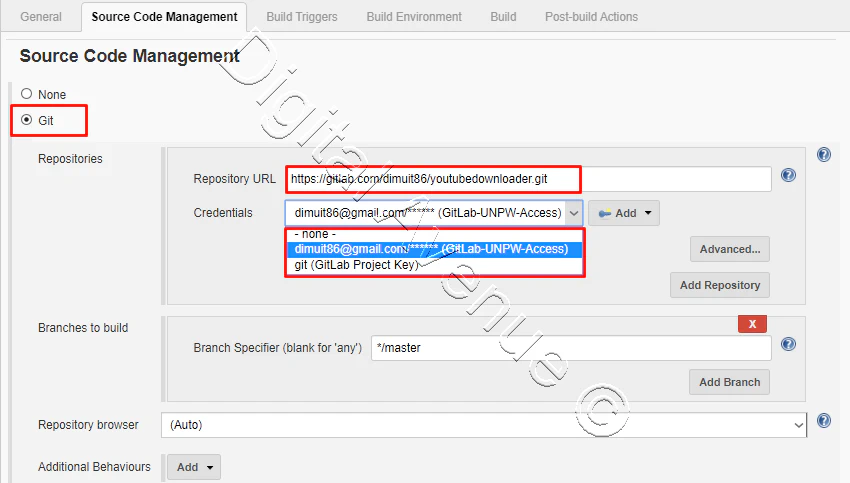
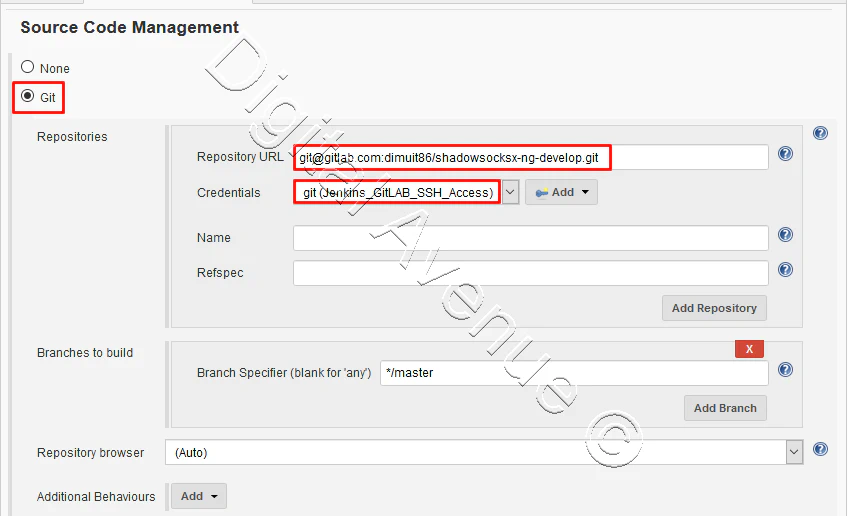
Now, Head-over to the “source code management” section and select “Git”.
Repository URL : git@gitlab.com :dimuit86/shadowsocksx-ng-develop.git
Credentials: Select added credentials from drop-down menu
Attach new credentials to the SSH URL for the GitLab repository.
Optional: You also can use the plain Username and password that we have added to the method (2).
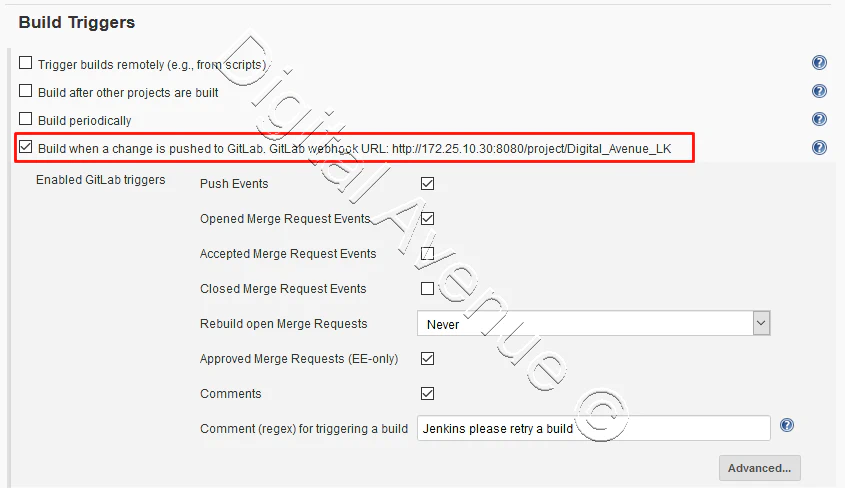
On the same configuration page, find the “Build Triggers” section and check the option to “Build when a change is pushed to GitLab”.
 Finally, Apply and Save Changes
Now, GitLab integration with Jenkins has been completed. Now, We can check the connectivity, using the build button and checking console logs.
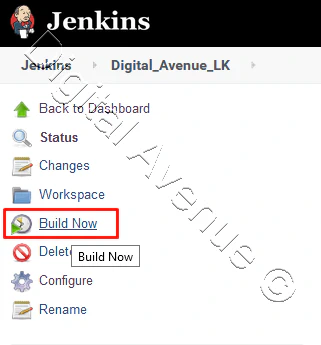
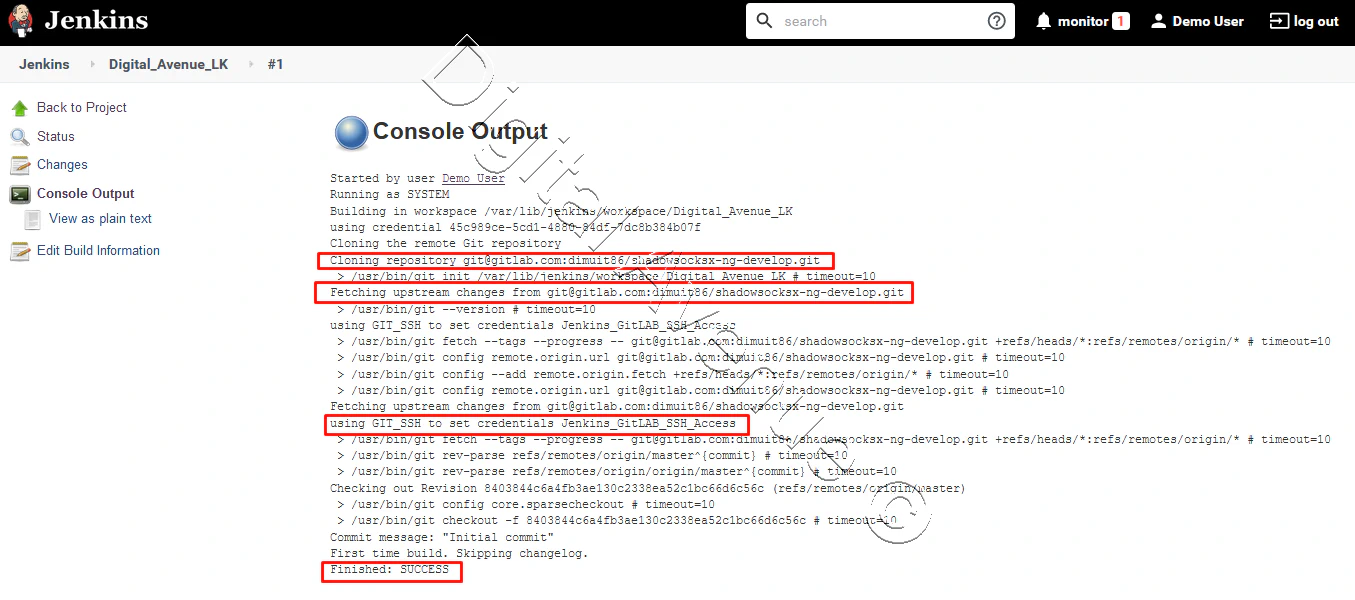
Voilà, It’s working.
Deploy Production Grade Kubernetes Cluster on Azure AKS
Introduction This tutorial is intended to demonstrate how to setup your 1st Kubernetes cluster on Azure Kubernetes Services (AKS). This tutorial will cover up all the steps that you need to setup complete AKS cluster.
Getting Started With Docker - Quick Start Guide
Getting Started With Docker - Quick Start Guide Docker Engine Platform as a Service (PaaS) Cloud platform service. Allows you to manage its application and data.
How To Run Microsoft SQL Server On Kubernetes - Azure Kubernetes Service
Prerequisites: Azure CLI https://docs.microsoft.com/en-us/cli/azure/install-azure-cli 1. Run the Azure CLI with the az command. 1.1 Run the login command. az login Login in the browser with the azure account.

