INSTALL AND CONFIGURE LibreNMS SERVER ON CENTOS 7

INSTALL AND CONFIGURE LibreNMS SERVER ON CENTOS 7
What is LibreNMS ?
LibreNMS is an opensource monitoring tool for servers and network hardware. Based on Nginx or Apache, MySQL, and PHP. LibreNMS can discover network using UDP, FDP, LLDP, OSPF, BGP, SNMP and ARP portocols.Collects monitoring metrices via SNMP protocol.
Prerequisite:-
1.Root login
2.CenstOS 7
3.EPEL repository
STEPS
STEP 1:-Install Required Packages.
STEP 2:-Install NginX Web Server.
STEP 3:-Install and Configure MariaDB.
STEP 4:-Download and Configure LibreNMS.
STEP 5:-LibreNMS Web-based Installation.
STEP 6:-Firewall and SELinux Configuration.
STEP 7:-Install FPing and SNMP.
STEP 8:-Set Permission.
STEP 9:-LibreNMS Web Installation.
STEP 1:- Install Required Packages
Configure EPEL Repository.
[root@LibreNMS ~]# rpm -Uvh https://dl.fedoraproject.org/pub/epel/7/x86_64/Packages/e/epel-release-7-11.noarch.rpm

Configure Webtatic Repository.
[root@LibreNMS ~]# rpm -Uvh https://mirror.webtatic.com/yum/el7/webtatic-release.rpm

Install some packages including ImageMagic, rrdtool, git, snmp, nmap, fping and more.
[root@LibreNMS ~]# yum install -y cronie fping git ImageMagick jwhois mtr net-snmp net-snmp-utils nmap rrdtool MySQL-python python-memcached
STEP 2:- Install Nginx Web Server
[root@LibreNMS ~]# yum install -y nginx
[root@LibreNMS ~]# systemctl enable nginx
[root@LibreNMS ~]# systemctl start  nginx

STEP 3:- Install and Configure PHP-FPM
Install PHP-FPM version 7 for CentOS7 from Webtatic repository. Webtatic repository has been installed on previous step.
[root@LibreNMS ~]# yum install -y composer php72w php72w-cli php72w-common php72w-curl php72w-fpm php72w-gd php72w-mbstring php72w-mysqlnd php72w-process php72w-snmp php72w-xml php72w-zip
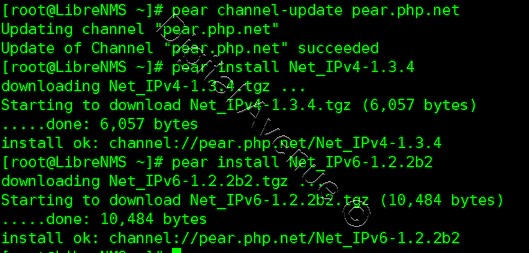
Update the PEAR (PHP Extension and Application Repository) repository.
[root@LibreNMS ~]# yum install php72w-pear.noarch
[root@LibreNMS ~]# pear channel-update pear.php.net
[root@LibreNMS ~]# pear install Net_IPv4-1.3.4
[root@LibreNMS ~]# pear install Net_IPv6-1.2.2b2

Set default timezone in the php.ini file. un-comment and edit look like below.
date.timezone = Asia/Colombo
cgi.fix_pathinfo=0
Now, Set PHP-FPM to running under the ‘sock’ file instead of the server port.
[root@LibreNMS ~]# vim /etc/php-fpm.d/www.conf
Change ‘listen’ port line to the sock file below.
touch /var/run/php-fpm/php7.2-fpm.sock chmod 777
/var/run/php-fpm/php7.2-fpm.sock
listen = /var/run/php-fpm/php7.2-fpm.sock
Ucomment the ‘listen’ owner, group and the permission of the sock file.
listen.owner = nginx
listen.group = nginx
listen.mode = 0660
[root@LibreNMS ~]# systemctl start php-fpm.service
[root@LibreNMS ~]# systemctl enable php-fpm.service
Now, PHP-FPM should running under the sock file.
[root@LibreNMS ~]# netstat -pl | grep php
STEP 3:- Install and Configure MariaDB
Install MariaDB
[root@LibreNMS ~]# yum install -y mariadb mariadb-server
[root@LibreNMS ~]# systemctl start mariadb.service
[root@LibreNMS ~]# systemctl enable mariadb.service
Set root password? [Y/n] Y
Remove anonymous users? [Y/n] Y
Disallow root login remotely? [Y/n] Y
Remove test database and access to it? [Y/n] Y
Reload privilege tables now? [Y/n] Y
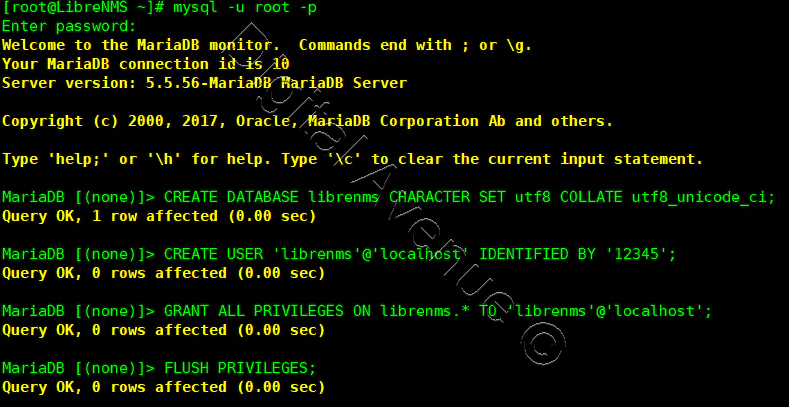
Create a new database and a user for LibreNMS.
Create database named “librenms” and a user named “librenms” with password **
[root@LibreNMS ~]# mysql -u root –p
MariaDB [(none)]> CREATE DATABASE librenms CHARACTER SET utf8 COLLATE utf8_unicode_ci;
MariaDB [(none)]> CREATE USER 'librenms'@'localhost' IDENTIFIED BY '<PASSWORD>';
MariaDB [(none)]> GRANT ALL PRIVILEGES ON librenms.* TO 'librenms'@'localhost';
MariaDB [(none)]> FLUSH PRIVILEGES;
MariaDB [(none)]> quit;

Edit /etc/my.cnf file and add new configuration.
Paste below additional configuration under the ‘[mysqld]’ section.
innodb_file_per_table=1
sql-mode=””
lower_case_table_names=0

[root@LibreNMS ~]# systemctl restart mariadb.service
STEP 4:- Download and Configure LibreNMS
Create new system user named ‘librenms’ and define the home directory under ‘/opt/librenms’ and add ‘librenms’ user to ‘nginx’ group.
[root@LibreNMS ~]# useradd librenms -d /opt/librenms -M -r
[root@LibreNMS ~]# usermod -a -G librenms nginx
Clone LibreNMS into /opt/librenms directory.
[root@LibreNMS opt]# cd /opt/
[root@LibreNMS opt]# git clone https://github.com/librenms/librenms.git librenms
This Step is optional…
Create new directories for LibreNMS logs and rrd files.
[root@LibreNMS opt]# mkdir -p /opt/librenms/{logs,rrd}
[root@LibreNMS opt]# chmod 755 /opt/librenms/rrd/


Change ownership of all files and directories under ‘/opt/librenms’ to the ‘librenms’ user and group.
[root@LibreNMS opt]# chown -R librenms:librenms /opt/librenms/

Configure LibreNMS virtual host
LibreNMS is a Web-based application and we using Nginx web server to host it. Create a new virtual host file user ‘librenms.conf’ under Nginx ‘conf.d’ directory.
[root@LibreNMS ~]# vim /etc/nginx/conf.d/librenms.conf
Paste configuration below.
server {
 listen      80;
 server_name librenms.orelit.com;
 server_name 192.168.100.10;
 root        /opt/librenms/html;
 index       index.php;

 charset utf-8;
 gzip on;
 gzip_types text/css application/javascript text/javascript application/x-javascript image/svg+xml text/plain text/xsd text/xsl text/xml image/x-icon;
 location / {
  try_files $uri $uri/ /index.php?$query_string;
 }
 location /api/v0 {
  try_files $uri $uri/ /api_v0.php?$query_string;
 }
 location ~ \.php {
  include fastcgi.conf;
  fastcgi_split_path_info ^(.+\.php)(/.+)$;
  fastcgi_pass unix:/var/run/php-fpm/php7.2-fpm.sock;
 }
 location ~ /\.ht {
  deny all;
 }
}
Deploy Production Grade Kubernetes Cluster on Azure AKS
Introduction This tutorial is intended to demonstrate how to setup your 1st Kubernetes cluster on Azure Kubernetes Services (AKS). This tutorial will cover up all the steps that you need to setup complete AKS cluster.
Getting Started With Docker - Quick Start Guide
Getting Started With Docker - Quick Start Guide Docker Engine Platform as a Service (PaaS) Cloud platform service. Allows you to manage its application and data.
How To Run Microsoft SQL Server On Kubernetes - Azure Kubernetes Service
Prerequisites: Azure CLI https://docs.microsoft.com/en-us/cli/azure/install-azure-cli 1. Run the Azure CLI with the az command. 1.1 Run the login command. az login Login in the browser with the azure account.


